A5—Altair interactive charts
Due 2023-10-13, 11:59pm EST 16ptsFollow all the instructions below.
Please post any questions about this assignment on Slack.
Warning: This is an individual assignment.
Table of contents
- Change log
- Aim of the assignment
- Instructions
- Submission instructions
- Grading
- Tips, tricks, and troubleshooting
Change log
- 2023-10-09: Added gifs of interaction.
- 2023-10-09: Fixed an issue about the drop-down filter specification. A student got a bug bounty! +1 pts
- 2023-10-08: Fixed issues where the headings were inconsistent with the text. A student got a bug bounty! +2 pts
Aim of the assignment
This assignment revisits what you learned in class about using Vega-Altair along with Jupyter Widgets to add basic interactivity. It will help you practice creating interactive charts in a Jupyter Notebook.
Instructions
If you run into problems see the tips, tricks, and troubleshooting section below.
Please look through all the materials below so you understand the setup instructions; how to run, organize, and submit your code; and our requirements for the visualization.
Setup instructions
-
Accept the GitHub Classroom assignment invitation by clicking this link to get your repository:
https://classroom.github.com/a/gTLUPiMP
For reference, this is the template repository your repository is being created from: https://github.com/NEU-DS-4200-F23/A5--Altair_interactive_charts.
Recall our general instructions and policies on GitHub Classroom assignments.
-
Clone your GitHub-Classroom-generated repository to your local machine.
E.g., in your terminal / command prompt
CDto where you want the folder for this activity to be. Then run:git clone <YOUR_REPO_URL> CDor open a terminal / command prompt window into the cloned folder.-
Create and activate a virtual environment for this project. You may need to modify the code you use depending on what Python you have installed and how your machine is configured. To do so, run the setup commands below.
-
On macOS or Linux, run these three commands separately in case there are errors:
python3 -m venv envsource env/bin/activatewhich python -
On Windows, run these three commands separately in case there are errors:
python -m venv env.\env\Scripts\activate.batwhere.exe python
Check the path(s) provided by
which pythonorwhere.exe python—the first one listed should be inside theenvfolder you just created. -
-
Install necessary packages.
python -m pip install -r requirements.txtThis may take a few minutes.
Run Jupyter Lab and create a notebook
- Run
python -m jupyter lab. It should open Jupyter Lab in your default browser. - Create a new Jupyter Notebook named
boston-weather.ipynb.
Load the dataset
The data we will be using is included in your template repository in the file boston-weather-mid.csv.
Warning: There are two other variants of the data in the folder.
The data is from Weather.gov NOWData. Prof. Dunne extracted the monthly summary data por–2023 as of 2023-10-06, replaced “T” and “M” with blank for the missing data, loaded in PowerQuery to unpivot months then to pivot measure.
- In your notebook, load the CSV file.
Create two interactive visualizations following the examples below
Using Altair, create two interactive visualizations following the methods we used in the in-class tutorial. They should look like this:
-
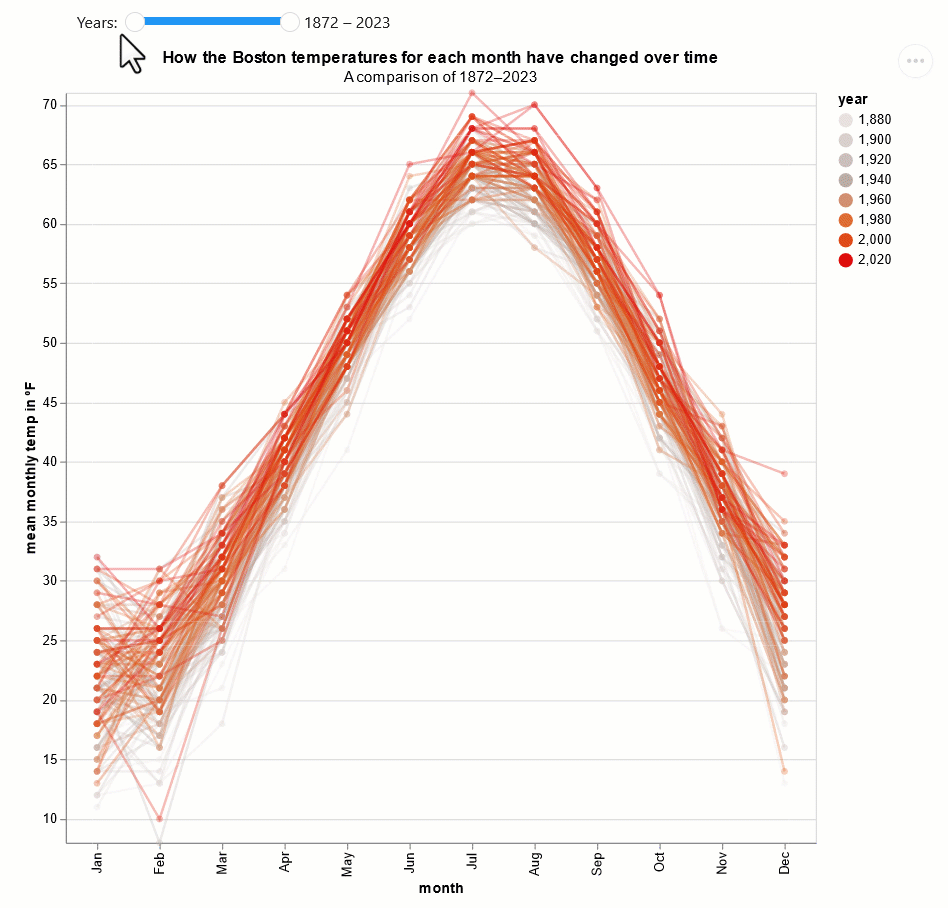
First interactive visualization. This one should filter the visible timelines and update the subtitle based on the year range in the Jupyter Widget. The y-axis should stay the same.
-
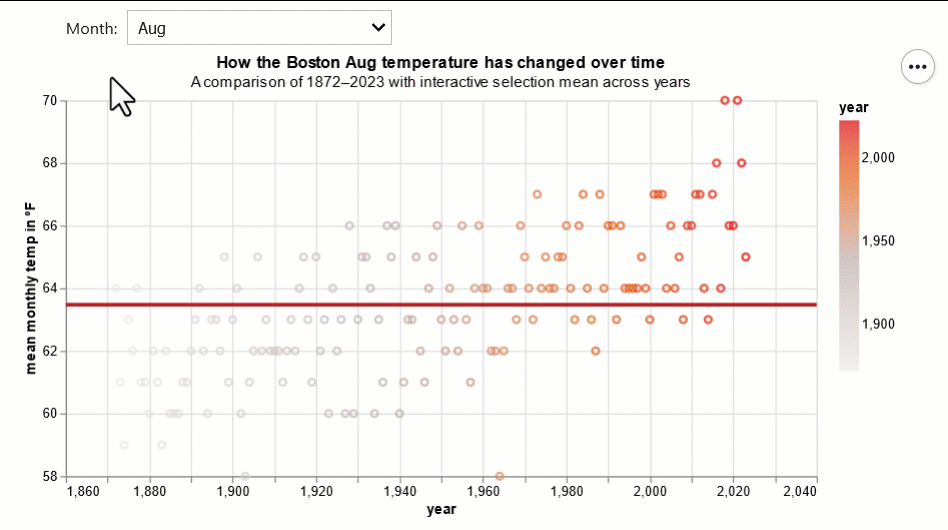
Second interactive visualization. This one should filter to only the month chosen in the Jupyter Widget. Using Altair’s brush interaction, the user should be able to select a range on the x-axis and have the mean of the temperatures for that month plotted as a horizontal line.
Include your visualizations in README.md as PNGs
-
Export both your visualizations as PNG files and embed in the
README.mdfile so that they will be displayed when we browse to your GitHub repo. If we are unable to run your notebook, at least we can see the output.Please see the GitHub Markdown documentation for how to include an image. Note that Altair lets you save a PNG file directly using the ⋯ menu in the top-right of a visualization and Inkscape has a PNG export feature.
When you are done…
Optionally clear your output
- I used to warn folks to clear the outputs of all cells before commiting .ipynb files. This decreases file size, removes unnecessary metadata, and makes diffs easier to understand. In Jupyter Lab you can use the GUI: Edit->Clear All Outputs. But here, we’re using the
jupytextpackage to automatically create a twin.pyfile you can run using normal Python! It is much easier to diff.
Quit Jupyter Lab and the virtual environment
- Make sure to save your .ipynb file and shutdown Jupyter Lab properly through the file menu. Otherwise, you need to use
jupyter notebook stop. - Deactivate the venv to return to your terminal using
deactivate.
Commit and push your code (but first…)
-
Only if you have made any changes to the required packages (you probably didn’t), first export a list of all installed packages and their versions:
pip freeze > requirements.txt -
Make sure to add all your required files, including the
.ipynbfile and any PNG and SVG images to the git repo. -
Finally, commit all your local files and push them to the remote repository on GitHub.
Submission instructions
-
Ensure that:
- Both visualizations are present in your notebook and both visualizations are present in
README.md. - All of your required files including
boston-weather.ipynband any images are committed and pushed to the remote repository on GitHub which was generated by GitHub Classroom. We will grade based on what is available in that repository.
- Both visualizations are present in your notebook and both visualizations are present in
-
Submit the URL of your repository to the assignment
A5—Altair interactive chartsin GradeScope.Warning: Do not put a link to a personal repository. It must be within our class GitHub organization.
Grading
| Criteria | Points |
|---|---|
| Visualization 1 | 8 pts |
| Visualization 2 | 8 pts |
| 16 pts |
Tips, tricks, and troubleshooting
If you run into trouble, first look at our relevant tutorials which have tips & tricks: